Sept. 2012 Menu and Recipes
***All our recipes serve 6***
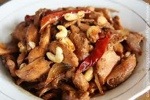
Nicole – Orange Beef Stir Fry with Brown Rice

Sauce:
2 cup Florida’s Natural® Brand orange juice (I blended with white grape juice)
2 tbsp. soy sauce
4 tbsp. cornstarch
2 tsp. chopped ginger (used ground ginger)
2 tsp. garlic paste
Brown rice
1 lb of cut sirloin
You add vegetables and 1 tbsp of cornstarch to sauce if needed.
Prep Day Directions: Made brown rice in rice cooker, put 6 cups in quart bag (6 cups per family). Mix up sauce ingredients. Made 2 cups of sauce per family. Put 1/2 cup sauce in a quart bag with the meat. Put rest of sauce in a separate bag.
Serve Day Directions: Thaw all three bags.Heat oil in pan. Cook meat, add sauce and desired vegetables.
Note: I may not have added enough corn starch. Please add another tablespoon if desired.
Ashley – Sweet and Spicy Chicken Stir Fry with Noodles
Following recipe will make 4 meals
4 lb. boneless, skinless chicken breast
4 c. Apricot Preserves
3 Tbsp. apple cider vinegar
6 Tbsp. ginger, grated
2 Tbsp. crushed red pepper flakes
16 med. carrots cut in very thin strips
8 c. snow peas, halved diagnally lengthwise
4 c. frozen broccoli
Prep Day Directions: Mix preserves, vinegar, ginger, pepper and 1 Tbsp. water. Place mix into a snack sized or quart sized Ziploc bag labeled “Stir Fry Sauce”. Cut chicken into cubes. Put into a quart sized bag labeled “Chicken”. Place veggies into gallon sized bag and add other 2 bags and seal.
Serve Day Directions: Thaw bag in fridge. Cook Chicken in oil til no longer pink. Transfer to a plate. Add veggies to oil, tossing, about 2 minutes. Return chicken to skillet, add stir fry sauce. Cook 2-3 minutes more. Serve with cooked Lo Mein noodles, provided.
Kristine – Southwestern Slow Cooker Lasagna

Adapted from groceryshrink.com
1 lb ground beef, browned and drained
1 15oz can black beans, drained
2 Tablespoons chili powder
2 teaspoons ground cumin
1 teaspoon garlic powder
1 lb shredded Colby-Jack cheese
9 uncooked lasagna noodles
1 jar (24 oz) salsa
1 cup (8 oz) plain yogurt
(I also added garlic and onions while browning the beef.)
3/4 cup water *you provide
Prep Day: Brown beef. Combine beef, beans, salsa and spices. Bag it. In a separate bowl, combine yogurt and cheese. Bag it. Label bags and box of noodles.
Serving Day: Thaw all bags. Put beef mixture into a bowl and stir in 3/4 cup water. Place a small amount of beef mixture in the bottom of a greased slow cooker. Top with three lasagna noodles, breaking if necessary. Continue the layers with cheese, sauce, noodles until you have three layers. Cover and cook on low for 6-8 hours on on high for 3-4 hours. (I did low for 6 hours and it was perfect!)
Serve with tortilla chips, corn bread or garlic bread!
Kellie – Chicken Tamale Pie
1-9oz diced cooked chicken
1-4.5oz chopped green chilies, drained
2 tsp. taco seasoning
1 cup mexican blend cheese (4oz)
1-11oz. whole kernel corn w/ green and red peppers
1/2 cup cornmeal
1/2 cup bisquick mix
1 egg
3/4 cup milk
Optional: Lettuce, Sour Cream, Salsa
Prep Day Directions: In a medium bowl, mix chicken, chilies, and taco seasoning together and put in a quart sized bag; set aside. In medium bowl, stir together Bisquick mix, cornmeal, milk, egg, and mexicorn until blended and pour in gallon size bag. Put cup of cheese into small baggie. But all 3 baggies together and freeze.
Serve Day Directions: Thaw in refridgerator over night. Preheat oven to 400F. Spray 9 inch pie plate with non-stick spray. Pour chicken mixture into pie plate and sprinkle with cheese. Pour corn mixture over the chicken and cheese mixture and bake for 25 to 30 minutes or until toothpick is inserted and comes out clean. Cut into wedges and serve with mexican rice.
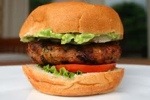
Erin – Turkey Burgers
Serves 8
2 lbs. ground turkey
2 Tbsp minced garlic
1 tsp fresh ginger (minced)
2 fresh green chiles, diced (omitted this time)
1 medium red onion, diced
1/2 cup cilantro, finely chopped
1 tsp salt
1/4 cup soy sauce
1 Tbsp black pepper
3 Tbsp paprika
1 Tbsp ground dry mustard
1 Tbsp ground cumin
1 dash Worcestershire sauce
Optional: cheese, lettuce, and/or tomatoes if your heart desires.
Prep Day Directions: Combine ingredients and form into patties. Flash freeze on a cookie sheet. Place 6 patties into labled freezer bags.
*This recipe makes 8 patties. I made 7 batches, and gave each family 6 burgers.
Serve Day Directions: Thaw burgers.
Grill: Moisten paper towel with cooking oil and lightly coat the grill rack. Grill uncovered over medium heat 8 – 10 minutes per side or until internal temp is 165.
Broil: 4 inches from heat 8 – 10 minutes per side or until internal temp is 165.
Skillet: cook over medium-high heat 5 – 6 minutes per side or until juices run clear and temp is 165.
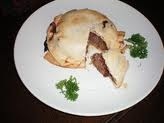
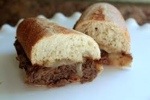
Andi – French Dip

1 medium yellow onion
3/4 c beef broth
1/4 c soy sauce
1/2 c water
1 Tbsp Worcestershire
1 Tbsp spicy brown mustard
1 Tbsp minced garlic
3 lb chuck roast
6-8 sandwich rolls, split
6-8 slices provolone or Swiss cheese
Prep Day: Slice onion into 1/4-inch rounds, place in freezer bag. Add broth, soy sauce, water, Worcestershire, mustard, and garlic. In large freezer bag: roast, bag of au jus,
cheese. Freeze.
Serve Day: Pour onions and au jus into bottom of slow cooker. Salt and pepper both sides of roast, place on top of onions. Cook on low 6 – 7 hours until beef is fall apart tender. Transfer roast to cutting board and shred using 2 forks. Remove onions and set aside. Strain juice and remove oil that collects on top with spoon. Return roast, au jus and onions to slow cooker on “keep warm”. Heat broiler. Place split rolls on lined baking sheet and toast 1 minute or until bread begins to brown. Remove roll tops, set aside. Scoop beef onto roll bottoms and top with cheese. Return to oven until cheese is melted. Top with onions and roll tops. Serve with small bowl of au jus.
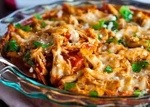
Kirsten – Italian Sausage Baked Ziti

Serving Size: 8-10
1 lb. Everett’s Ground Italian Sausage
1 medium onion
2 garlic cloves, minced
1 can diced tomatoes with juices
1 tsp. oregano
1 tsp. salt
pepper to taste
1 jar spaghetti sauce
18 oz. ziti, cooked and drained
2 tsp parmesan
2 cups shredded mozzarella
Prep Day Directions: Chop onion and put in a large pan, add garlic, salt, pepper and italian sausage. Brown until no longer pink. Add tomato, jar of sauce and oregano; simmer for 10-15 minutes stirring regularly. Cook pasta and drain. Mix all ingredients together in a large tin pan. Cover with plastic wrap and freeze. Put parmesan and mozzarella cheeses in a small freezer bag and freeze.
Serve Day Directions: Thaw overnight in the refrigerator. Take off plastic wrap and cover and bake at 350 degrees for 20-30 minutes (until hot throughout). Top with cheeses and bake an additional 5 minutes until cheeses melt.
Bridget – Savory Chicken Packets

3 cups chopped cooked chicken
1 package cream cheese
1 Tablespoon chopped chives (OR use chive flavored cream cheese!)
Pinches of shredded sharp cheddar
2 Tablespoons milk
1 Tablespoon onion powder
any additional seasonings to taste
2 (8 ounce) packages refrigerated crescent dinner rolls
**online reviews said alone, this recipe can be bland. Therefore, I heavily seasoned
You provide: 1/4 cup melted butter (or cooking spray)
**OPTIONAL**
Sauce for packets:
1 can cream of mushroom soup
1 can cream of chicken soup
a little milk
Mushrooms (sliced)
chopped green pepper and pimientos (optional)
Just heat up and pour over packets.
Prep Day Directions: Mix chicken, cream cheese, cheddar, seasonings and milk in a bowl (mixing with hands works best) to make filling, and store in a 1 qt freezer bag. Put breadcrumbs in another 1 qt bag, attach it to bag of chicken filling, and freeze. Refrigerate crescent rolls.
Serve Day Directions: Thaw chicken mixture. Preheat oven to 350°F. Unroll crescent rolls. Each tube will contain 4 rectangles of dough with a diagonal perforation. Press dough along each perforation so the rectangle halves will not separate. Place about 1/4 cup of the chicken mixture into the center of each rectangle. Fold dough over the filling, and pinch the edges to seal tightly. Dip each packet in melted margarine (or spray with cooking spray) and coat with breadcrumbs. Place packets on a baking sheet. Bake for 15 minutes or until golden brown. Packets are good either hot or cold
Lisa – Italian Beef Sandwiches

Ground Beef mixture:
1 medium onion
1 pound ground beef or turkey
2 garlic clove, pressed
1/4 cup water
1 Tbsp Italian Seasoning mix
2 Tbsp red wine vinegar
1 each green and red bell pepper, sliced
1 pkt. (1 oz.) onion soup mix
6 Hoagie rolls
6 slices Provolone Cheese
Prep Day Directions: Slice and Place onions, beef and pressed garlic into a 12″ skillet. Cook over med-high heat 15-18 minutes or until beef is no longer pink. Add water, Italian Seasoning mix, red wine vinegar. And freeze in freezer bag.
Pepper Mixture: Prepare and freeze in freezer bag. 1 each green and red bell pepper, sliced 1 pkt. (1 oz.) onion soup mix
6 slices Provolone Cheese
Place Beef, Peppers and Cheese in Bag labled #1.
6 Hoagie rolls, Place in Freezer bag labeled #2.
Serve Day Directions: Thaw kit in fridge. Place peppers and onion soup mixture in 10″ skillet and bring to a simmer over medium heat until tender. Add meat to pepper mixture to reheat. Place 1 slice of Provolone Cheese into each warm hoagie rolls. Top with Heated Peppers and Meat mixture.