Posted in Tips and Tricks

Tips and Tricks: Freezer Cooking Myths

Freezer Cooking Myths

20120711-163250.jpg

Myth #1 – It takes a all day to do the cooking.
The great thing about it is its flexibility. Don’t have a all day, do a fewer hour cooking session. Or triple up on your dinners for a few weeks and build up some reserves. Cook 10 of the same recipe and find 9 friends who will do the same, but a different recipe. Then swap ‘em. There are lots of ways to freezer cook! And after you try it for awhile, you will realize that the time you save in meal prep and clean up each evening is well worth the time it takes to shop and cook for large quantities.

Myth #2 – Only experienced cooks can do this.
Absolutely NOT! Only the most basic cooking knowledge is needed to cook most of freezer recipes. Most freezer recipes give very detailed instructions so that even the least experienced cook can be successful.

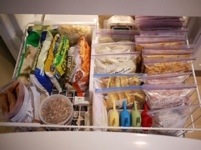
Myth #3 – Owning a stand alone freezer is a must.
About 30 gallon freezer bags will fit into a standard refrigerator’s freezer. But it does help to have some extra space. Upright freezers are easy to organize and take up less floor space. They also are an inexpensive option and hold a lot more food than you think!

Myth #4 – Freezer containers and pans will cost a fortune.
I use freezer bags most of the time because it is the most economical way. The foods in them can be thawed and put into your favorite dish for baking.

Myth #5 – Freezer foods don’t taste fresh.
Most freezer recipes are made “from scratch” and are designed so that you assemble your foods and freeze them to cook after thawing. I promise the aromas and flavors of fresh cooking will remain. For those busy days, you can choose to prebake some of your entrées and side dishes so that you only have a short warm up time.

Myth #6 – Most of the foods I love to eat probably can’t be frozen.
Actually, most foods freeze well! Try it and you will be surprised by how delicious your food will taste.

Myth #7 – Having meals in the freezer means that you can’t eat out.
Don’t believe it, but you probably won’t want to. Because you will be looking forward to eating your home cooking.

Myth #8 – My family will get tired of eating the same food over and over again.
The easiest way to avoid that is to meal plan for the month. In your meal plan, include some fresh meals that you generally make fresh such as breakfast for dinner, soup and sandwich night, taco night, etc. Make freezer cooking fun for your family by letting them help you pick out the recipes to include in your cooking day. This will make the recipe rotation more enjoyable for you and your family!

Myth #9 – My family won’t eat casseroles.
Freezer cooking doesn’t mean casseroles for every meal! There are so many different foods that freeze great. Try dump marinades, soup, sandwich, and breakfast recipes for starters!

Posted in Tips and Tricks

Tips & Tricks: Freezing Sandwiches

It’s Back to School Time! My kids start back on 8/29/12. Part of getting ready for school in our house is freezing sandwiches for the days my kids don’t like what’s on the school’s cafeteria menu.

20120812-233616.jpg

Selecting Ingredients: Make sure to use the fresh bread and the freshest ingredients possible. Fine textured breads and egg enriched breads tend to stay freshest longest.

Preparing for Freezing: Unless you are using peanut butter for filling, coat each slice of bread one side thoroughly with butter or margarine to keep filling from soaking in. For very moist fillings, freeze buttered bread first before spreading on filling. Bread and fillings can also be packed frozen separately and assembled at mealtime.

Packaging: Good quality packaging for freezing prepared sandwiches includes freezer grade plastic bags, rigid plastic containers, glass containers, heavy-duty aluminum foil and foil containers. Sandwiches should be double wrapped in heavy duty foil or in freezer plastic or packed in small, airtight container designed specially for sandwiches.

Storage Time: Store cheese, ham and bologna sandwiches for 3 to 4 weeks. All other sandwiches from 4 to 6 months.

Thawing: Let sandwiches left in wrappers thaw out in lunch boxes throughout the morning or in the refrigerator.

Fillings That Freeze Well: Peanut butter with or without jelly; cheese spreads; cream cheese mixtures with olives, nuts or raisins; and sliced meats, poultry and canned tuna. Small amounts of condiments, like ketchup, mustard or relish freeze fine.

Fillings That Don’t Freeze Well: Mayonnaise or oil based dressings.

Additional Tips: Add toppings like hard boiled eggs, lettuce, tomatoes and other fresh vegetables to sandwiches after thawing.

Posted in Tips and Tricks

Tips and Tricks: Freezer 101

Everything you need to know…

20120711-145441.jpg

These simple dos and don’ts will help you keep your freezer full of dinner options.

Freezing DO’s

DO label items before adding them to your freezer. Include a description, the serving size and the date.

DO keep a list of what is in your freezer and the dates things were added. Cross things off as you remove them.

DO store similar foods together – staples on one shelf, casseroles and prepared food on another.

DO freeze foods in individual portions. You can thaw only what you need and your thawing time is shortened.

Freezing DON’TS

DON’T choose containers that are too large for the food. Squeeze excess air from freezer bags before sealing.

DON’T fill your freezer with baking dishes. Line dishes with foil before assembling a casserole, wrap and freeze the finished casserole and then lift from dish and store in a resealable freezer-weight plastic bag.

DON’T fill containers of soups, stews and sauces to the very brim. Leave 1 inch of space to allow for expansion during freezing.