Posted in Dessert

Tasty Treats: Homemade Chocolate Covered Ice Cream Bars

Homemade Chocolate Covered Ice Cream Bars

20120717-173016.jpg

Adapted from Serious Eats

serves 4

1 pint good quality ice cream, flavor of your choice
1 (12oz) package semisweet chocolate chips
1/2 cup vegetable or mild olive oil
Wooden ice pop sticks (optional)
Sea salt or sprinkles

Prep Day: Line the baking sheet with parchment or wax paper and set aside. Fill a tall glass (an inexpensive vase will also do) with hot water. Note: Make sure the water is not boiling and the glass is at room temperature to make sure nothing explodes. Leave the knife in the hot water for 3-5 minutes.

Take the ice cream out of the freezer and remove the lid. It also helps to mark, or even cut off, the bottom “lip” of the carton before the next step, so your slices are sized evenly.

Mark the container with the knife approximately halfway up the height of the container. Very carefully, and keeping your fingers well out of the way, slice the carton in half crosswise. Cut each half in half again, place on the prepared sheet tray, and return to the freezer for 5 to 10 minutes to firm up again.

Meanwhile, melt the chocolate and oil together in the microwave or over a pan of simmering water on the stove, stirring well with a whisk or spatula to mix. Allow to cool to room temperature.

Remove ice cream slices from the freezer. With the tip of the knife, cut through one side of each of the carton-covered slices and peel off the carton. Insert a wooden stick halfway into each slice, replace on the sheet pan, and return to the freezer for 30 minutes.

Once the chocolate mixture is cool, take the bars out of the freezer. Working quickly, dip the bars in the chocolate mixture and return to the sheet pan (you may want to have a clean sheet of parchment or wax paper ready). Add sea salt, sprinkles, or other decorations before the chocolate sets up completely. Once all the bars are dipped, return to the freezer to set for 10 minutes before serving.

Serve Day: once frozen you can serve!

Posted in - 2012 Swap Recipes, - Pork, - Poultry, - Red Meat, - Seafood/Fish

Meal Swap: August 2012 Menu and Recipes

NOTE TO READERS: We make our recipes to serve 6 adults.

Italian/Mediterranean:
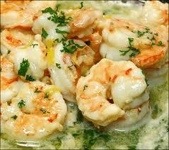
20120807-103023.jpg

Shrimp Scampi

1 pound large (16-20 count) shrimp, shelled* and de-veined, tail-on for presentation if you want
Salt and garlic salt
4 tablespoons butter
2 tablespoons finely chopped parsley
3/4 cup white wine
Freshly ground black pepper to taste
1 box of pasta

You Provide:
3-4 garlic cloves, slivered, or 1 Tbsp minced garlic (optional)
1 Tbsp lemon juice
2 tablespoons olive oil
1/2 to 1 teaspoon red pepper flakes (optional)

Prep Day – Combine seasoning with shrimp in gallon freezer bag. Put wine in separate pint freezer bag. Put butter in separate pint freezer bag. Combine into one bag. Freeze.

Serve Day – Heat a sauté pan on high heat. Reduce the heat to medium-high and add the olive oil and butter. Once the butter melts, foams up and subsides, add the garlic and red pepper flakes. Sauté for a minute, or until you see the edges of some of the garlic just beginning to brown. As soon as the garlic begins to brown, add the shrimp to the pan. Then add the white wine and stir to combine and coat the shrimp with the butter, oil, and wine. Spread the shrimp out in an even layer in the pan. Increase the heat to the highest setting and let the wine boil vigorously for 2-3 minutes. Turn the shrimp over, or toss them so the cooked sides are mostly facing up, and boil the wine for another minute. Remove from the heat, add the parsley and toss to combine. Add the lemon juice and black pepper. Serve alone, with crusty bread, over pasta (provided), or over rice (for gluten-free version).

20120807-104424.jpg

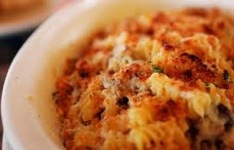
Italian Mac and Cheese

1 pound penne noodles
1 pound Italian bulk sweet sausage
2 tablespoons extra-virgin olive oil
1 tablespoon butter
3 or 4 cloves garlic, chopped
6 crimini mushrooms, sliced
Salt and pepper
2 tablespoons all-purpose flour
1 cup chicken stock
1 cup heavy cream
1 (10-ounce) sack, 2 1/2 cups, shredded Italian 4 cheese blend, available on dairy aisle
1 can diced tomatoes, drained well
1/2 cup Parmesan

Prep Day: In a nonstick skillet, brown & crumble sausage. Drain cooked crumbles on paper towel lined plate. Return pan to heat and add EVOO, butter, garlic and mushrooms. Season with salt & pepper. Saute for 3-5 minutes, until mushrooms are lightly golden. To mushrooms, add flour & stir, cooking 2 minutes. Whisk in stock, then stir in cream. Bring cream to a bubble, then stir in 2 cups of 4 cheese blend. When cheese has melted, add tomatoes. When sauce comes to a bubble, remove from heat and adjust seasonings. Cool and freeze in freezer bags.

Serve Day: Thaw sauce, combine with cooked pasta, transfer to baking dish. Sprinkle with remaining cheese and grated Parmesan over the top and brown under hot broiler.

Asian – Indian:

20120807-105102.jpg

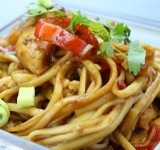
Honey Ginger Chicken with Noodles

adapted from mealsandmovesblog.com

for the marinade:

1/2 cup rice vinegar
2 TB honey
1 TB ginger
1 TB low sodium soy sauce
2 tsp chili garlic paste (found in the asian section of the market)
1 tsp garlic
1 1/2 lb boneless, skinless chicken breast, cubed into 1” pieces

for the sauce:

3/4 cup rice vinegar
2 TB honey
1 TB ginger
1 TB low sodium soy sauce
1 tsp garlic
for the rest of the dish:

1 package soba noodles
1 cup green onions (about 7-8 onions), diced
1 cup bell peppers (any color), diced

You Provide:
2 TB toasted sesame oil, divided
salt & pepper, to taste
fresh cilantro for garnish

Prep Day: whisk together marinade ingredients (except chicken). add chicken to marinade. coat well and add to freezer bag. whisk together the sauce ingredients. bag it. chop onions and peppers. bag it.

Serve Day: thaw bags. cook noodles. heat a skillet over medium heat. add 1/2 TB toasted sesame oil. add chicken and cook through. discard remaining marinade. remove chicken from skillet and set aside. return skillet to medium heat and add 1/2 TB toasted sesame oil. add onions and peppers to skillet. sauté for 3-4 minutes until onions and peppers begin to wilt. remove peppers and onions from skillet and set aside with the chicken. return skillet to medium heat and add 1/2 TB toasted sesame oil. add sauce to skillet and cook until it thickens to a glaze—it will reduce by at least half. while sauce is reducing, combine cooked noodles with remaining 1/2 TB toasted sesame oil, chicken, onions, and peppers. pour glaze over noodles and toss to coat. season with salt and pepper, to taste. serve immediately with a bit of chopped fresh cilantro for garnish

20120807-105727.jpg

Pineapple Ginger Flank Steak

3/4 cup pineapple juice
1 tablespoon minced ginger
1/4 cup soy sauce
1/4 cup canola oil
4 cloves garlic, minced
1.5 pounds flank steak

Prep Day: Whisk together the first 5 ingredients in medium sized bowl. Label Ziploc bag, place flank steak inside the bag. Empty contents from bowl into bag, seal, and freeze flat.

Serving Day: Thaw overnight. Remove steak and discard marinade. Place steak on preheated grill and cook until steak is still slightly pink on the inside – about 10 minutes on each side depending on the thickness of the steak. Remove steak from grill and slice against the grain before serving.

Southwestern/Latin American:
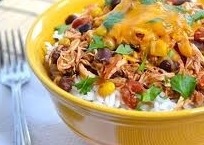
20120807-110126.jpg

Taco Chicken Bowl

Adapted from Budgetbytes.com

1-1/2 lbs. chicken breasts
16 oz. salsa
15 oz. can black beans, drained
8 oz. frozen corn
1 Tbsp chili powder
1/2 Tbsp cumin
1/2 Tbsp minced garlic
1/2 tsp dried oregano
1/4 tsp cayenne pepper
1/4 tsp salt cracked pepper to taste
2 c dry rice
8 oz. shredded cheddar

You Provide:
1/2 bunch cilantro (optional)

Prep Day: Label bags Put all ingredients except cheese, rice and cilantro into a gallon size freezer bag. Put cheese into quart size freezer bag. Put rice into sandwich bag. Freeze chicken mixture and cheese.

Serve Day: Put chicken mixture and 1/4 cup water into slow cooker. Cook on low for 8 hrs. Near the end of cooking time, cook the two cups of rice. Simmer in 5 cups water for 15 min. Let stand for 5 min. Fluff with fork. If cooking one cup at a time, use 2-1/2 cups water. After 8 hours of cooking, stir with a fork to shred chicken. Build taco bowls by placing rice on the bottom, then the taco chicken mix, shredded cheese and fresh cilantro.

Posted in Healthy Eating

Healthy Eating: Stock Your Freezer for Health

How to Stock You Freezer for Health

There are many places you can turn when you’re feeling lazy or are too busy to cook a fresh meal, but instead of reaching for that take-out menu to turn to your freezer. My biggest temptation is Buster’s on 28th and Bill’s Garden Chinese directly down the street from my home. I cannot whip up something as quickly as I can order from them. Their food is awesome, but is substantially more expensive than anything I could make and I’m sure you can guess which is healthier too.

Your freezer is an invaluable resource for storing foods that are best made in large batches. Frozen fruits and veggies from the grocery store can also come in handy when you are in a pinch. Below is my personal list of freezer essentials, but please add your own in the comments and tell us how you use them:

20120708-221305.jpg

Frozen Rice: An essential item in every freezer should be giant bag of frozen brown rice balls packaged for serving. Whole grains take quite a while to cook, but if you make a lot and freeze them you only need to cook grains occasionally. In addition to rice, you can also freeze other grains like barley and steel cut oatmeal.

Cooked Legumes: Legumes are some of the healthiest food you can eat, and are among the best sources of protein on the planet. The only problem is they can take a long time to cook. You can make beans in large batches in the pressure cooker, freeze the rest in tupperware containers and thaw at your leisure.

Frozen Fruit: I always have a few bags of frozen organic blueberries for the days I run out of fresh fruit for my cereal. They thaw pretty fast, sometimes I put them in the microwave for 30 seconds and are pretty tasty. They are great in oatmeal and pancakes as well.

Walnuts: I keep my walnuts in the freezer to prevent the unstable omega-3 fatty acids from going rancid. Other nuts likely store well in the freezer too but tend to be more stable at room temperature than walnuts, which are particularly high in omega-3s.

Soups: Soup is not my family’s favorite, but there are a few we love. If you have ever browsed through our menus you will see lots of great soups, try one. A freezer filled with your favorite creations that can be eaten on busy days is a life saver.

Bread – Don’t fill it regular sliced grocery store bread that is full of preservatives, dough conditioners and other bizarre ingredients that belong in the lab. Instead, I like to make my own 5 minutes a day artisan bread, cut it up into single servings and freeze it in gallon freezer bags. You will be shocked at how nicely frozen bread reheats in an oven set to 325F. Also you can take it out a day early and thaw it in the fridge.

Meat: Most of you already know that meat stores well in the freezer, but you can also store scraps and bones to make your own stock. Conveniently, you can also freeze your homemade stock.

Sauces: During the summertime our local markets are practically giving away basil. It is such a wonderful herb, I cannot help making big batches of pesto all season. Leftover sauces can be frozen and taken out in winter when your favorite flavors are harder to find.

Spices: I love when I am able to grind my own spices, but like many things it is easier to do it in large batches. Extra spices store well in sealed containers in the freezer.

Your freezer is a great resource and I encourage you to be creative. It can make healthy eating much easier by giving you quick access to healthy foods, and also spares you from boring cooking when you cook in large batches.

Before I sign off I would love to share with you my favorite bread recipe.

100 Percent Whole-Wheat Sandwich Bread

20120708-220915.jpg

Whole wheat flour has a nutty, slightly bitter flavor, and it caramelizes easily, yielding a rich, brown loaf. Milk and honey are tenderizers, and their sweetness complements the bitter notes. Although we’ve showcased a loaf-pan method here, this dough also makes lovely free-form loaves on a baking stone.

Makes 3 1 1⁄2 pound loaves

1 1⁄2 tbsp granulated yeast (1 1⁄2 packets)
1 tbsp plus 1 tsp salt
1/2 cup honey
5 tbsp neutral-flavored oil, plus more for greasing the pan
1 1⁄2 cups lukewarm milk
1 1⁄2 cups lukewarm water
6 2⁄3 cups whole wheat flour

Mix the yeast, salt, honey, oil, milk and water in a 5-quart bowl or other container.

Mix in the flour using a spoon, high-capacity food processor with dough attachment, or a heavy-duty stand mixer with dough hook.

Cover loosely, and allow to rest at room temperature until the dough rises and collapses (or flattens on top); about 2 to 3 hours.

The dough can be used immediately after the initial rise, though it is easier to handle when cold. Refrigerate in a lidded (not airtight) container and use over the next several days.

On baking day, lightly grease a 9-by-4-by-3-inch loaf pan. Using wet hands, scoop out a 11⁄2 pound (cantaloupe-sized) hunk of dough. Keeping your hands wet (it’ll be sticky!), quickly shape it into a ball.

Drop the loaf into the prepared pan. You’ll want enough dough to fill the pan slightly more than half-full.

Allow the dough to rest for 1 hour and 40 minutes. Flour the top of the loaf and slash, using the tip of a serrated bread knife.

5 minutes before baking time, preheat the oven to 350 degrees, with an empty broiler tray on another shelf.

Place the loaf in the center of the oven. Pour 1 cup of hot water into the broiler tray and quickly close the door. Bake for 50 to 60 minutes, or until deeply browned and firm.

Allow to cool completely before slicing in order to cut reasonable sandwich slices and freeze if you want.

How else can your freezer help you eat healthy?