Healthy Ways To Use Your Freezer

By Jenny Sugar (fitsugar.com)
Open most people’s freezers and you’re likely to see a pint of ice cream and TV dinners. While these foods may be freezer staples, they’re not helping you on your quest to lose weight. But, when used right, the freezer is the perfect weight-loss tool for you.
Presoaked Beans
Whether you’re into black, kidney, or pinto beans, these little gems are packed with low-fat protein, so they’re a great alternative to meat or dairy products. Their high fiber content is also extremely filling, and a full belly will prevent overeating.
If you’re freaked about the BPA found in the lining of most canned beans, a safe (and cheaper) alternative is to soak and boil dried beans. They need to be soaked overnight though, so if you forget, then it’ll be tough to make your famous bean burritos.
Since presoaked beans won’t last long in the fridge, ensure you always have beans for dinner by soaking a big batch one night. In the morning, drain and thoroughly rinse the beans. Measure out two-cup serving sizes of presoaked beans and store them in glass containers. Or if you prefer using bags, place the beans on a cookie sheet in the freezer, and after an hour, transfer the beans to freezer bags.
When you’re ready to make dinner, grab the beans and boil them in water for 45 to 60 minutes and they’re ready to go.
Fruit Puree
I learned this trick while making baby food for my daughter. Instead of buying fruit-flavored yogurt, which can contain extra calories from added sugar, buy plain yogurt and flavor it yourself.
Puree a batch of fresh or frozen fruit in the food processor or blender, and pour spoonfuls into baby food containers or ice cube trays. You can save room in your freezer by popping frozen fruit puree cubes into a freezer bag. Then when it’s time to eat, just take out a cube and stir it into your bowl of plain yogurt.
Store Leftovers
The next time you bake an enormous spinach lasagna, vegetarian shepherd’s pie, kale casserole, or big batch of bean soup, instead of storing leftovers in the fridge, where they often go bad, save them in the freezer. Divvy up appropriate portion sizes into reusable containers, so the next time you need a quick, healthy meal, it’s ready to go.
If you remember in the morning, you can transfer the containers to the fridge and allow them to thaw all day, or if they’re in glass containers, just pop them in the microwave. It sure beats ordering high-calorie takeout!
Smoothie Ingredients
Smoothies may be a quick breakfast to slurp down, but they certainly can take a great deal of prep, especially if you use fruit you need to peel like mangoes, oranges, or kiwis. Prepping ahead of time means you can whip up a smoothie in just a few minutes.
Wash, peel, and dice fruit and store the smoothie ingredients you’d use for one smoothie in bags in the freezer. My favorite is one sliced banana, one cup of blueberries (can use frozen), six sliced strawberries, half a cup of sliced mango, and a handful of spinach. Cutting the fruit in small chunks is recommended to ensure they puree well.
Pour the frozen fruit in your blender or food processor and add yogurt, milk, peanut butter, or whatever other ingredients you choose, and your smoothie will be ready in no time.
Pizza Dough
Homemade pizza tends to be much healthier than a pie you’d have delivered from the local pizzeria because you can use whole-wheat crust, not a ton of cheese, and lots of fresh veggies.
Either keep premade whole-wheat pizza crusts in the freezer, or you can buy dough (or make your own) and store wrapped balls of dough in the freezer. You just need to remember to thaw it in the fridge a few hours before dinner so it’s ready to roll.
Frozen Treats
Instead of opening the fridge just to have a pint of high-calorie ice cream staring back at you, stock your freezer with healthier frozen treats. Frozen sorbet bars are a great option, but you can also freeze your own desserts such as these peanut butter smudgies or fruit and yogurt popsicles.
A very yummy recipe for you try…Vegetarian Shepherd’s Pie
Potatoes (8 white or sweet or a mix of both, each about the size of a lemon)
1 32 oz. container of Veggie broth
2 peppers (I prefer 1 red and 1 orange)
1 zucchini
3 stalks of celery
6 mushrooms
4 big carrots
1 can of beans (I prefer black or kidney)
Salt and pepper to taste
2 cups of shredded cheddar cheese (optional)
2-3 tbsp butter (optional)
1 clove of garlic, minced
Prep Day: Place a big pot of water on the stove on High heat. While the water is heating to a boil, peel the potatoes (unless you love mashed potatoes with the skins). Then dice them up and place them in the pot of boiling water. Now get another pot, pour the broth in and place it on the stove on Medium heat.
While that’s warming up, cut up all the veggies and place them in the broth. Feel free to add other kinds of veggies if you want. Strain and rinse the canned beans and add them to the broth too. Mix everything up and allow to cook uncovered.
Check on the potatoes, and when they’re soft, strain out the water in a colander, and return them back into their original pot. Using a fork or a masher, while they’re still steaming hot, mash the potatoes until creamy. If you’re using regular potatoes, you can add garlic and butter for a smoother texture. If you’re using sweet potatoes, they don’t really need any butter (they’re creamy enough). Add salt and pepper to taste.
Set the mashed potatoes aside, and turn on the oven to 350°F. Now check on the veggies cooking in the broth. You want to cook them for only about 10 minutes or so, so they’re still slightly firm.
Now take a rectangular glass casserole dish, and using a slotted spoon place all the veggies in the dish. Now pour some of the leftover liquid over them, enough so that the veggies are covered, not swimming. You can save the leftover broth (if there is any) in a container in the freezer for a later recipe.
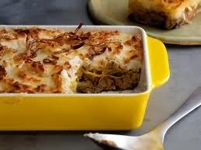
Now carefully scoop the mashed potatoes over the veggies, smoothing them out with the back of a spoon in a nice even layer. If you like cheese, go ahead and sprinkle it on top. I did half and half so you can see what it looks like. Wrap with plastic wrap and foil. Label and freeze.
Serve Day: Thaw. Bake at 400 degrees for 20-30 minutes or until topping is brown and meat is heated through. To heat from the frozen stage, add 10-15 minutes more baking time. You’ll know it’s ready when either the cheese is melted and bubbly, or the potatoes are slightly hard on top. Allow to cool for 10 minutes before serving. If you have any leftovers, place them in plastic containers in the fridge.
