In basic terms, freezer cooking is preparing meals ahead of time and freezing them for later use. Freezer cooking is a strategy that I have used faithfully for years to make ahead meals that are homemade and nutritious to feed my family during the week. It is the perfect solution for busy families that want to begin eating healthy meals in place of the typical high calorie week night takeout.
I believe this style of meal preparation serves as the cornerstone of my commitment to health. It allows me to have control over the ingredients in my foods along with keeping portion sizes and calories in check. Planning and preparing meals ahead of time for freezing is one of the first steps in losing weight. To get you started, I created the list below to serve as a beginner’s guide to freezer cooking…
Schedule two blocks of time for freezer cooking. The first time block is to shop for all the ingredients and the second is to prepare and cook everything. If you absolutely can’t find the time during the week or weekends to freezer cook, your next best bet is to cook double or triple batches of meals you are already making. I prefer to cook every 2-3 weeks. That way I am only doing serious grocery shopping and cooking twice a month. With my busy schedule that is all I can handle.
Create a menu 3-4 days before shopping and cooking days. Start with recipes you know. When cooking meals in large batches to freeze, it is safer and smarter to begin with tried and true recipes that you know how to prepare and your family likes to eat. When you are just starting out, it is not the time to experiment with new recipes. Pick 3-4 favorite recipes to get started. As you get the hang of freezer cooking, you can add more recipes to your repertoire. The more you practice this method the easier it will get. You will find the groove that works for you in no time.
Clean out the freezer. Before you start cooking batches of dinners to last the next 2-3 weeks, you need to make sure there is room in the freezer. Many people think that, in order to freezer cook, they need a large deep freezer. That is not the case. I have a large deep freezer and even on my heaviest cooking days I don’t come close to filling it up. For the most part, as long as my fridge and freezer is cleaned out and organized, I have plenty of room to store all my meals.
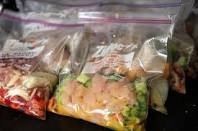
Use freezer storage containers and bags. This may seem like common sense but, I can’t tell you the number of times that I would make huge amounts of food and could not find lids or ran out of freezer bags. The lesson I learned from those experiences is to always check my storage supplies prior to cooking. I primarily use disposable containers and freezer bags from brands such as Gladware® and Ziplock®. These products have worked perfectly and the best for me. In my experience I have used other methods of storing foods such as tinfoil, casserole dishes, or freezing in glass jars, but they are not always most reliable. Be very careful with glass because water expands when it freezes. For now, I will stick with the plastic disposable containers for the most part.
Organize recipes by ingredients. Before I begin prepping, I first put all the ingredients for each recipe out on the table. This way I can make sure I have everything I need to begin and finish a recipe without having to go back and forth to the store numerous times to pick up the missing ingredients.
Prep all the ingredients. Trim and chop all the meat, chop vegetables, shred cheese, and whatever else needs to be prepped ahead of time. I have found this to be the easiest way to move seamlessly through each recipe and have 2-3 different meals cooking at the same time.
Put together a good play list and start cooking. Mondays are always the day that I use to do my freezer cooking. I start around 1pm and usually end at 4:00 pm. I have the music playing and just get to work enjoying afternoon of cooking.
Hope this helps you!
What are your tips for beginners in freezer cooking?