Stock Your Freezer

By Annie, Annie-eats.com
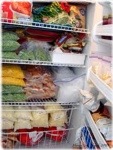
I realized that I mention in quite a few of my posts, “This freezes well.” I have started to say this so often (especially where scones are concerned!) that you all must think I have a completely packed freezer all the time. Not true, but I do keep a lot of things I consider to be freezer staples. I thought I would share a glimpse into my freezer and the items I consider freezer necessities.
First, let me say, I am not a food scientist. I am not here to tell you how long various items keep in the freezer. Almost any food can be frozen, but that doesn’t necessarily mean it will taste fabulous after being thawed. I use this website from the USDA on freezing safety all the time as a guideline for how to freeze certain things and how long they will keep well (specifically meat, poultry, seafood, etc.) It also has great information on thawing. One important thing I have taken from this site is that if food has been thawed in the refrigerator, it is safe to refreeze without cooking. You don’t know how many chicken breasts this little factoid has saved me!
Also, the point of this post is not freezing whole, already prepared meals. While that certainly can be done and I have done it in the past, I personally prefer fresh cooked meals to things pulled from the freezer. Instead I try to utilize my freezer as a resource with lots of ingredients and items I use frequently to make preparing all those freshly cooked meals a bit more convenient.
Since learning to bake so many breads, rolls, etc. at home, I have found that most baked goods, especially those with yeast, freeze extremely well. As long as they are frozen while fresh, they taste practically as good as new when they are thawed and rewarmed in the oven. For things like hamburger buns, pita, sliced bread and rolls I like to thaw in the microwave for a minute or two on the defrost setting and then warm in the oven. Other things like pizza dough, puff pastry, tart/pie dough are best thawed in the refrigerator for a day.
Hamburger buns – After discovering this recipe for *homemade hamburger buns, I no longer buy them from the store. I like to make a double batch and keep them in the freezer for whenever a burger mood strikes.
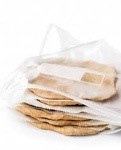
Pita bread – I’ve taken to making double batches of *pita bread. We tend to eat through one batch quickly, so I keep the rest in the freezer. You know, for gyros emergencies.
Sandwich bread – I have found that most homemade bread freezes very well. I slice it before freezing so I can pull out just a slice or two at a time as needed. My favorite is this *whole wheat bread.
Pizza dough – I did a whole post about freezing my favorite *pizza dough. I can hardly live without this stuff in my freezer. It can make for a very quick dinner of pizza or calzones using whatever toppings/fillings you have on hand. I never even bother writing a date on these bags because we go through it so quickly.
Dinner rolls – I love having *rolls in the freezer. They can be quickly pulled out, defrosted and rewarmed in the oven for an additional side to help add bulk to any meal. This is especially wonderful once fall rolls around and I’m eating soup all the time. Soup and homemade rolls = yum.
Puff pastry dough – Once I learned how manageable it is to make my own *puff pastry dough, and how much (much!) better it tastes than store-bought, I can’t go back. I keep a block or two on hand all the time.
Tart and pie dough – Tart and pie doughs freeze well and can be used after thawing in the refrigerator. Right now I have a batch of the *basil garlic tart dough for the tomato mozzarella tart in my freezer. I should go use it – yum!
Scones – I’ve mentioned it countless times, but *scones are a freezer staple. Mix the dough, shape it, and freeze without baking. Then you can bake directly from the freezer by simply adding a few minutes to the baking time. You can have fresh from the oven scones whenever you want with minimal effort.

I don’t typically buy a ton of frozen fruits and vegetables simply because I tend to prefer fresh, but here are the items that I usually keep around:
Pineapple chunks – I like to buy fresh pineapple, cut into chunks and freeze to keep on hand for snacking or smoothies (Andrew and I LOVE smoothies!) Or of course, *piña coladas.
Blackberries, strawberries, raspberries – To throw into smoothies or use in various fruit desserts and cake fillings. I don’t use them that often because I prefer fresh berries, but it is nice to have them on hand.
Edemame – Boiled or steamed until tender and tossed with coarse salt, edemame is a wonderful snack or side dish.
Pea and carrot mix – I mainly keep this around for *shrimp fried rice since it is one of my favorite dinners.
Cranberries – I hoard them every fall and keep them in the freezer. Right now I have four bags – guess I should use them up since fall is just around the corner!
Banana – If your bananas are teetering between overripe and garbage, don’t feel like you have to make banana bread immediately. You can freeze them! I like to mash them up, measure the amount, and then freeze in a plastic bag. I love having this on hand whenever a craving for *banana muffins strikes.
Pumpkin – Similar to banana, you can also freeze pumpkin. Once I’m in the pumpkin baking groove, I tend to have no trouble going through a can but if it is one of those monster-sized cans of puree, you can freeze it and reuse later.

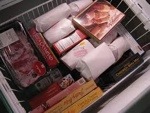
We buy almost all of our meat and poultry from the local butcher shop. I like to call ahead and place large orders so we can have enough to feed us for a few weeks. For the items that I portion out and freeze individually like chicken breasts, I write the date and quantity on the bag so I know how much I have and how long it should keep. The things we most often have on hand in this part of our freezer are:
Chicken breasts – The majority of our protein comes from chicken breasts, so I order a lot and portion them into individual bags with one or two pieces each. This makes it easy to thaw the exact amount we will need for each meal.
Ground turkey – I use ground turkey in *chili, *creamy taco mac, and *turkey meatloaf, as well as *turkey burgers (the mixed and shaped patties of these burgers can be wrapped and frozen as well.)
Ground beef – Usually frozen in 1 lb. portions since that is what most recipes call for.
Pork tenderloin – There are so many wonderful recipes for pork tenderloin. It is a great freezer staple to have on hand because it lends itself to simple preparation and easy entertaining.
Shrimp – Other than shrimp, I don’t tend to freeze much in the way of seafood because I prefer to buy it fresh and use it quickly.
Bacon – I never use more than a few pieces of bacon at a time, so we freeze the extra and use as needed.
Pizza sauce – Sort of a miscellaneous item that doesn’t exactly fit in one of the other categories, I tend to keep a batch of *pizza sauce frozen for a last minute pizza for dinner, or for dipping *pizza bites!

Since I bake so often, there aren’t tons of sweets that I keep in my freezer on a regular basis. These are the two exceptions.
ICE CREAM – No freezer is complete without *ice cream. My current flavor is *cookies and cream, but any kind will do. I also keep leftover brownies and Reese cups frozen for mix-ins or for use in other desserts.
Chocolate chip cookie dough balls – These are my *favorite cookie of all, so keeping the dough balls in the freezer is an absolute necessity. No matter what other sweets I do or don’t have around the house, having these in the freezer means I am always able to serve a guest a sweet treat fresh from the oven (Similar to the scones, I just bake these from frozen.)
And finally, the bowl of my ice cream maker lives in the bottom of my freezer because you never know when the need to make ice cream will strike. But in this house, we do know that it strikes often.
So, there you go! A little glimpse into my freezer. I hope it was helpful. The freezer can be a really wonderful kitchen tool if you use it to your advantage.
*recipes you can find on her website.